Use a soft, dampened sponge or cloth. Never use abrasive materials such as hard-bristle brushes or scouring pads to clean the fixture surface. Use of any abrasive materials may damage the porcelain glaze.
Use a gentle, non-caustic cleanser. Wipe surfaces clean and rinse completely with water immediately after applying cleanser. Rinse and dry any overspray that lands on nearby surfaces. Do not allow cleaners to soak on surfaces.
Toilet bowl cleaners should be used at least once a week. Use a long-handled brush to clean the rim holes and to clean as far into the trap as possible to prevent mineral deposits from forming. Most toilet bowl cleaners are not harmful to the vitreous china surface of the toilet bowl. Follow the cleaner instructions carefully.
Do not use in-tank cleaners in your toilet. Products containing chlorine can seriously damage fittings in the tank. This can lead to leakage and damage. Use of in-tank cleaners voids the product warranty.
For stains, we recommend baking soda and vinegar.
- Turn off the water supply and flush the toilet to drain most of the water.
- Pour 2 cup of ordinary white vinegar into the toilet bowl. Using a toilet brush, swish it around. Let it sit for a few or so.
- Sprinkle a cup of baking soda into the toilet bowl followed by 2 more cups of vinegar. Be prepared, as this is going to create a fizzing action. Leave it for about 10 minutes.
- Using the toilet brush, swish some more because you want to make sure this solution reaches stains above the water line and under the rim. Still, do not flush.
- Let the solution sit for 30 minutes, swishing it occasionally until the stains are gone. Scrub any remaining stains with the toilet brush or scrubby sponge.
- Flush the toilet to rinse.
SYMPTOM: Water is running constantly
- CAUSE #1: Fill valve issue. Clean debris from fill valve head. See HOW DO I CLEAN MY TOILET FILL VALVE? for instructions on how to clean your fill valve.
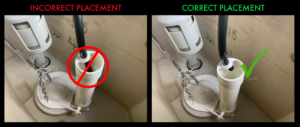
- CAUSE #2: Fill tube issue. The fill tube which connects your fill valve to your flush valve may be pushed too far down into the flush valve overflow tube. See the pictures below for proper tube placement.
SYMPTOM: Water is running intermittently. This may be from water leaking from the tank to the bowl. To identify the source of the leak, we recommend a dye test. Simply pour a colored liquid (coffee, water with a 1-2 drops of food coloring, etc.) into the tank. If the dyed liquid appears in the bowl, then water is leaking from the tank.
- CAUSE: Flapper or flush valve issue. Clean the flapper to clear any debris that might be compromising the seal. Alternatively, re-install the flush valve, and check for any crimping of the flush valve gasket. If the gasket is crimped, the flush valve may need to be replaced.
SYMPTOM: Tank Lever gets stuck in the down position and causes the toilet to run / doesn’t come back up quickly
- Check that the tank lever mounting nut is tightened properly.
- Check that the tank lever rod isn’t catching on the re-fill tube going into the overflow pipe. If so, re-adjust the position of the re-fill tube, or re-install the flush valve such that the overflow pipe is further up and out of the way.
- If the above suggestions do not resolve the problem, contact Icera Customer Service department at service@icerausa.com for further assistance.
Sometimes sediment build-up can get trapped inside the head of the toilet fill valve which can cause the toilet to run. This can usually be resolved by cleaning the valve. Watch the short video below to see how to clean your fill valve.
If the problem persists after you’ve cleaned the valve, please reach out to our Customer Service department for further assistance.
SYMPTOM: Poor Flush (newly installed toilet). If flushing performance is not as expected with a newly installed fixture:
- Check that the tank lever chain is taut (tight). There should be no slack in the chain.
- Increase the tank water level. See HOW DO I ADJUST THE WATER LEVEL IN MY TOILET TANK? for instructions.
- Have plumber check & unclog plumbing vents.
- Still having issues? Contact our Customer Service department at service@icerausa.com for further assistance.
SYMPTOM: Poor Flush (previously installed toilet). If the toilet has been installed and working fine for some time and is now no longer functioning properly:
- Usually not an issue with the toilet.
- Check that the tank lever chain is taut (tight). There should be no slack in the chain.
- Unclog plumbing lines; have plumber snake down to at least 20 feet with a power snake/auger.
- Check & unclog the plumbing vents (as above),
- Check for tree root growths disrupting the home sewer lines (e.g., Roto-Rooter).
- Increase the tank water level. See HOW DO I ADJUST THE WATER LEVEL IN MY TOILET TANK? for instructions.
The water level in your tank should be set appropriately in order to get a complete flush. If too much water is entering the tank, the excess will be discarded via the overflow tube. Over time, this may affect the overall water consumption.
The water level should be at or slightly above the “WL” marking (water line) stamped into the back wall of the tank. If the water level in your tank is not at or near this line, take the following steps to adjust the float level on your fill valve.
- Using a Philips head screwdriver, rotate the blue screw at the top of the fill valve float.
- Rotate clockwise to adjust the float up and rotate counterclockwise to adjust the float down.
Ensure you have the correct flapper for your toilet. Click here to view your options. Older Icera toilets (produced 2016 and prior, with original tank parts) use a different flapper from the current models. Compare to your current flapper to make sure you have the correct one.
- Turn off the water supply to the toilet and flush until the water is cleared from the tank.
- Disconnect the flapper chain from the tank lever rod. Snap the old flapper off of the flush valve, and snap the new flapper on.
- Connect the new chain to the lever rod, making sure that the chain is taut with little to no slack. Adjust the chain as needed.
- Turn on the water supply and allow the tank to fill.
- We suggest running a dye test to ensure the new flapper is sealing correctly. Put a few drops of food coloring into the tank until the water is slightly colored. Check the bowl to make sure no colored water is leaking from the tank into the bowl.
- If colored water is leaking into the bowl, the flapper chain may be too taut. Try loosening the chain a bit.
If your elongated toilet seat looks too short on your toilet, this is usually a problem with the initial installation. This can be easily resolved by removing and reinstalling the seat properly. Watch the short video below to see how to correctly install your seat.
Watch the short video below to see how to install your round-front toilet seat.
Your toilet model number is stamped inside the toilet tank on the back wall. It usually begins with a C-, followed by 4 numerical digits: C-####
For St. Thomas Creations or St. Thomas by Icera branded toilets, the model number will be in the following format: 6###.###
Side-mount trip lever handles can stick in the down position after the toilet is flushed when the installation is done improperly. Typically this means the lever was not oriented correctly before the mounting nut was tightened. This is usually only an issue with side-mount levers. To fix the issue:
- Using a pair of adjustable pliers, loosen the mounting nut but do not completely remove it. Note: the mounting nut is reverse-threaded. In other words, right = loosen and left = tighten.
- Orient the lever handle to as close to a perfectly horizontal position as possible and hold it there.
- Tighten the mounting nut while holding the lever in position. Note: Tighten the mounting nut by hand first, then use your pliers to tighten it an additional 1/4 turn. Do not overtighten. This may cause the tank to crack.
Rear-outlet bowls feature a washdown type of flush. A washdown toilet uses a direct flow of water to push waste straight through the trap, rather than pulling it with a siphon. As a result, you will see a smaller water surface area compared to traditional toilets. This is purposeful in the design and cannot be adjusted.
You can purchase genuine Icera replacement parts—including seats, tank levers, fill valves, flappers, and other service components—as well as Cramer repair products directly through our website.
For toilets, sinks, vanities, bidet seats, and other complete Icera products, please use our Store Locator to find an authorized Icera dealer or showroom near you.
Icera replacement parts are stocked in multiple warehouse locations throughout the United States and Canada, including Southern California, Houston, New Jersey, the Greater Toronto Area, and the Greater Vancouver Area.
Orders are typically shipped from the warehouse best positioned to fulfill your order quickly and efficiently based on product availability and destination.
Most replacement parts orders ship within 5 business days of order confirmation. Once your order has shipped, delivery typically takes an additional 2–7 business days, depending on the warehouse location and your delivery address.
You will receive shipping confirmation and tracking information as soon as your order is on its way.
Icera products are designed in California and manufactured through a combination of company-owned factories and trusted production partners throughout Asia. The majority of Icera ceramic products are produced in China, including at factories owned and operated by Icera.
All products are developed and manufactured to meet Icera’s quality, performance, and regulatory standards for the North American market.